Twenty-eight minutes on high pressure, followed by ten minutes of natural release. That’s your baseline. But wild rice isn’t a one-size-fits-all grain, and that timing shifts depending on the texture you’re after, the brand in your pantry, and whether you’re working with pure wild rice or a blend. Let me walk you through the variations that actually matter.
The Short Answer: Timing for Perfect Wild Rice
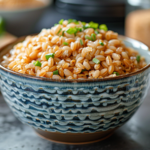
The standard timing delivers tender grains with a pleasant chew: 28 minutes at high pressure, then 10 minutes of natural release before venting manually.
But here’s where it gets interesting. Wild rice responds to time adjustments more dramatically than white or brown rice. A few minutes either way changes the entire texture.
For firmer grains (ideal for salads or grain bowls where you want distinct texture): 20 to 25 minutes high pressure, 10 minutes natural release.
For tender side dish texture (my go-to for most meals): 28 to 30 minutes high pressure, 10 minutes natural release.
For very soft grains (perfect when folding into soup): 30 minutes or more, with full natural release.
The timing varies because wild rice isn’t standardized like cultivated rice. Age matters. Brand matters. Even the harvest conditions affect how quickly the grains soften. Start with 28 minutes, taste, and adjust next time based on your preference.
Wild Rice vs Wild Rice Blend: Different Timings
Not all packages labeled “wild rice” contain the same thing, and that changes your approach.
Pure wild rice (long black grains, nothing else) needs the full 28 to 30 minutes. It’s tougher, denser, takes longer to break down. This is true wild rice, technically an aquatic grass seed, and it demands patience even under pressure.
Wild rice blends (like Lundberg’s mix with brown rice, red rice, black rice) cook in about 28 minutes but sometimes less. These blends combine wild rice with softer grains that cook faster. The result is a more forgiving timing window.
Check your package. If you see multiple grains listed in the ingredients, you’ve got a blend. If it just says wild rice, you’re working with the real deal.
Blends are easier to find, less expensive, and more forgiving if you overshoot the timing by a minute or two. Pure wild rice gives you that distinctive chewy texture and earthy flavor, but it’s less forgiving and pricier.
The Water Ratio That Works
The Instant Pot needs less water than stovetop cooking because nothing escapes. The sealed environment traps every drop of steam.
Use 1 cup of wild rice to 1.5 cups of water. That’s your ratio. Scale it up or down, but keep that proportion.
Some recipes call for 1:2 (one cup rice to two cups water). That works too, especially if you prefer softer grains or you’re cooking pure wild rice rather than a blend. I stick with 1:1.5 because it gives me tender grains without excess liquid pooling at the bottom.
Swap water for broth if you want deeper flavor. Chicken broth, vegetable broth, even mushroom broth if you’re feeling fancy. The rice absorbs everything, so bland liquid equals bland rice.
Salt is optional but recommended. A quarter teaspoon per cup of rice wakes up the natural nuttiness. Without it, wild rice can taste flat, especially if you’re using water instead of broth.
Step by Step: Cooking Wild Rice in the Instant Pot
Here’s the process stripped to what actually matters.
Rinse the rice. Place it in a fine-mesh strainer and run cold water over it until the water runs clear. This removes surface dust and prevents the grains from clumping together or developing an off smell during storage. Don’t skip this. Dirty wild rice smells musty and tastes worse.
Add rice, water, and salt to the Instant Pot. Pour in your rinsed rice, measure the water (or broth), add salt if using. Stir once to make sure nothing’s stuck to the bottom.
Lock the lid and set the valve to sealing. Make sure the silicone ring is seated properly and the valve is turned to the sealed position. If the valve is set to venting, the pot won’t pressurize.
Cook on high pressure for 28 minutes. Use the Manual or Pressure Cook button, adjust to High, set the timer. The pot will take about 8 to 10 minutes to come to pressure before the actual cooking starts. That’s normal.
Let pressure release naturally for 10 minutes. When the timer beeps, don’t touch anything. Let the pot sit for 10 minutes. This gentle cooldown finishes cooking the rice without making it mushy.
Release remaining pressure manually, then open. After 10 minutes, turn the valve to venting. Once the float pin drops, unlock the lid. Be careful of the steam.
Fluff with a fork. Use a fork, not a spoon. A spoon smashes the grains together. A fork keeps them separate and light.
How to Know When It’s Done
Wild rice doesn’t get soft and fluffy like white rice. It stays chewy. That’s the point. But there’s a difference between chewy-good and undercooked-hard.
Perfectly cooked wild rice shows grains that have started to split open slightly, revealing a lighter interior. The texture is firm but tender, with a pleasant bite. No hard crunch in the center when you chew.
Undercooked rice feels too hard, almost crunchy. The grains stay tightly closed. You’ll feel resistance when you bite down, and the center tastes raw and starchy.
Overcooked rice splits wide open, the grains look bloated and mushy, and the texture turns soft instead of chewy. It’s not terrible, just less interesting.
Take a spoonful and taste it. If it’s too firm, add a quarter cup of water, seal the pot again, and cook on high for another 5 minutes with a 10-minute natural release. If it’s too soft, remember for next time and cut the cooking time to 25 minutes.
Troubleshooting Wild Rice Problems
| Problem | Cause | Fix |
|---|---|---|
| Too hard or crunchy | Not enough cooking time or insufficient water | Add ¼ cup water and cook 5 more minutes on high pressure, then 10-minute natural release |
| Mushy or split open | Overcooked or too much time under pressure | Reduce cook time to 25 minutes for next batch |
| Clumpy or smelly | Rice wasn’t rinsed before cooking | Always rinse until water runs clear before adding to pot |
| Sticking to bottom | Keep Warm setting left on too long | Turn off Keep Warm immediately after releasing pressure |
| Watery or soupy | Too much liquid for the amount of rice | Drain excess liquid or let rice sit uncovered for a few minutes to absorb |
Most problems trace back to not rinsing the rice or misjudging texture preference. Wild rice is forgiving under pressure compared to stovetop, but it still needs attention.
Storing and Reheating Wild Rice
Cooked wild rice keeps well, which makes it perfect for meal prep.
In the fridge: Transfer cooled rice to an airtight container. It stays fresh for up to 5 days. The texture firms up when cold, but that’s normal.
In the freezer: Portion the rice into freezer bags or containers, press out the air, and freeze for up to 3 months. I like freezing in one-cup portions so I can grab exactly what I need.
Reheating: Add a splash of water or broth to the rice before reheating. This restores moisture. Microwave covered, stirring halfway through, or warm gently on the stovetop with a lid.
Cold wild rice works beautifully in salads without reheating. Toss it with roasted vegetables, vinaigrette, nuts, and fresh herbs for a grain bowl that holds up in the fridge for days.
Twenty-eight minutes gives you reliable results, but don’t be afraid to adjust for the texture you actually want. Wild rice rewards experimentation, and the Instant Pot makes it easy enough to try again without standing over a pot for an hour.