Twenty-five minutes. That’s how long white rice takes in the microwave: 5 minutes on high power, 15 minutes at 50% power, and 5 minutes resting with the lid on. Brown rice needs 30 to 35 minutes because of its fibrous bran layer. The method is dead simple, and the ratio is always 1 part rice to 2 parts water.
Exact Cooking Times for White Rice
The Basic Timing Formula
For 1.5 cups of raw white rice, you need 2.25 cups of water. The cooking unfolds in three phases: 5 minutes at 100% power to bring the water to a rolling boil, 15 minutes at 50% power to let the grains absorb the water gently, and 5 minutes of rest with the lid firmly in place.
This two-phase approach prevents the starchy water from bubbling over your microwave while allowing the rice to steam evenly. The high power phase gets things moving fast. The medium power phase finishes the job without creating a mess.
Quick Reference Table
| Rice Quantity | Water Needed | High Power (100%) | Medium Power (50%) | Rest Time |
|---|---|---|---|---|
| 1 cup | 2 cups | 5 minutes | 12 minutes | 5 minutes |
| 1.5 cups | 2.25 cups | 5 minutes | 15 minutes | 5 minutes |
| 2 cups | 3 cups | 5 minutes | 18 minutes | 5 minutes |
These times work for jasmine, basmati, and standard long-grain white rice. Short-grain sushi rice follows the same timing.
Brown Rice Takes Longer
Brown rice is a different beast entirely. That bran layer wrapping each grain acts like armor. It takes more time and more water to penetrate.
For 1 cup of brown rice, use 2.5 to 3 cups of water. Cook 15 minutes on high power, then 15 minutes at 50% power, then rest 5 minutes. Total time: 35 minutes from start to finish.
Check the texture after resting. If the grains still feel chalky in the center, add a quarter cup of water and microwave 3 more minutes on high. Brown rice forgives imprecision better than white rice does.
What Microwave Power Means
Understanding Your Wattage
Most home microwaves run between 900 and 1100 watts. The timing formula above assumes a 900-watt machine. If your microwave is weaker or stronger, adjust accordingly.
Lower wattage (700 to 800 watts): Add 2 to 3 minutes to the medium-power phase. Your microwave takes longer to heat water, so the rice needs extra time to soften.
Higher wattage (1200 watts or more): Reduce the medium-power phase by 1 to 2 minutes. The intense heat cooks faster, and you risk overdoing it.
Find your microwave’s wattage on the label inside the door or on the back panel. If you can’t locate it, start with the standard timing and adjust from there.
The Two-Power Trick
Starting on high power brings the water to a boil within minutes. This rapid heating jump-starts the cooking process and gets the grains moving.
Dropping to 50% power slows things down. The microwave cycles on and off, heating gently rather than blasting continuously. This prevents the starchy water from foaming up and spilling over the sides. It also allows the rice to absorb water evenly without scorching the bottom layer.
Cooking the entire 20 minutes on high power guarantees a sticky mess inside your microwave and unevenly cooked rice. Cooking the entire time on medium power leaves you with a hard, crunchy center. The two-phase method is the only way that works reliably.
The Right Container Matters
Your container needs to hold at least double the volume of your rice and water combined. If you’re cooking 1.5 cups of rice with 2.25 cups of water, that’s 3.75 cups total. Use a bowl or pot that holds at least 8 cups.
Glass is ideal. Pyrex bowls and CorningWare dishes handle the heat beautifully and won’t warp. Ceramic works too, as long as it’s labeled microwave-safe.
Microwave-safe plastic containers designed for rice cooking are fine, but make sure the lid has built-in vents. Steam needs an escape route. If your lid fits too tightly, it will pop off mid-cook or, worse, warp from the pressure.
No vents on your lid? Set it on top loosely without snapping it into place. Leave a small gap for steam to escape.
Place a folded kitchen towel under the container. If the water bubbles over despite your best efforts, the towel catches the spill before it burns onto the microwave floor.
Water Ratio is Non-Negotiable
The ratio for white rice is simple: 1 part rice to 2 parts water. Always. Use a measuring cup, not your eyes. One cup of rice gets two cups of water. Half a cup of rice gets one cup of water.
This ratio holds true whether you’re cooking jasmine, basmati, or plain long-grain rice. The microwave’s even heat distribution makes this foolproof.
Brown rice breaks the rule slightly. Use 1 part rice to 2.5 or 3 parts water because the bran layer drinks more liquid. Start with 2.5 and increase if needed.
Don’t try to eyeball it. Rice is unforgiving. Too much water creates mush. Too little leaves you gnawing on hard grains.
Common Timing Mistakes
Opening the Lid Too Early
The 5-minute rest period is not optional. It’s part of the cooking process, not a suggestion.
When you pull the rice out of the microwave, the grains are still absorbing the last bit of moisture. The trapped steam finishes the job. Open the lid too soon, and that steam escapes. You’re left with rice that’s cooked on the outside but slightly firm in the center.
Wait the full 5 minutes. Walk away if you have to. Check your phone. Resist the urge to peek.
Wrong Power Level Throughout
Cooking rice for 25 minutes straight on high power creates chaos. The water boils violently, spills over the rim, and leaves you with a scorched mess and undercooked rice.
Cooking for 25 minutes on medium power sounds safer but doesn’t work either. The water never reaches a proper boil. The rice sits in lukewarm water, absorbing it too slowly. The center stays hard.
The two-phase method is non-negotiable. High power to start, medium power to finish.
Skipping the Rinse
Rinsing rice doesn’t change the cooking time, but it changes the texture dramatically.
Unwashed rice is coated in excess starch. That starch dissolves during cooking and turns the rice gummy and sticky. The grains clump together instead of staying separate and fluffy.
Rinse the rice three or four times before adding the measured water. Fill the bowl, swish the grains with your hand, pour out the cloudy water. Repeat until the water runs mostly clear. This takes 30 seconds, maybe a minute if you’re slow.
You’re not washing away nutrients. You’re washing away dust, starch, and the occasional tiny bug. Just do it.
How to Tell When Rice is Done
After the rest period, lift the lid. Look at the surface. You should see small steam holes scattered across the top where air escaped during cooking. The rice should look dry, with no standing water pooling at the edges.
Press a grain between your fingers. It should feel soft all the way through, with no hard center. If you bite into it, the texture should be tender but not mushy.
If the rice is still slightly firm, add 2 tablespoons of water, cover again, and microwave 2 more minutes on high. Let it rest another 2 minutes. Check again.
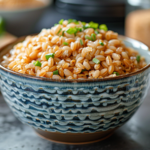
If the rice is perfect, fluff it with a fork to separate the grains and release any trapped steam. Serve immediately or cover and keep warm.
Different Rice Types, Different Times
Not all rice cooks at the same speed. The grain size and processing method determine the timing.
Jasmine and basmati rice: 20 to 25 minutes total (5 high + 12 to 15 medium + 5 rest). These long-grain varieties cook quickly and fluff beautifully.
Short-grain sushi rice: 22 to 25 minutes total (5 high + 15 medium + 5 rest). Slightly stickier by nature, which is what you want for sushi or rice bowls.
Brown rice: 30 to 35 minutes total (15 high + 15 medium + 5 rest). The bran layer slows everything down.
Wild rice: 25 to 30 minutes total (10 high + 15 medium + 5 rest). Use a 1:1.5 rice-to-water ratio because wild rice is denser and needs less liquid.
Troubleshooting
Rice Still Hard After Full Time
You followed the timing exactly, but the rice is still firm when you bite into it. This happens when your microwave runs cooler than average or when you used less water than needed.
Add 1/4 cup of water to the pot. Stir gently to distribute it. Cover and microwave 2 more minutes on high power. Let it rest 2 more minutes. The extra water and heat will finish the job.
Rice Overflowed Everywhere
Starchy water bubbled over the rim and coated the inside of your microwave. Annoying, but fixable.
The problem is container size. Your bowl was too small to handle the expanding rice and boiling water. Next time, use a bigger bowl. Double the volume of your rice and water, minimum.
Place a towel under the dish to catch spills before they become baked-on disasters.
Rice is Mushy
Overcooked rice turns to mush. There’s no way to reverse it.
This happens when you add too much water or cook for too long. Stick to the 1:2 ratio religiously. If you used brown rice, use 2.5 cups of water per cup of rice, not 3.
Mushy rice can be salvaged in fried rice or rice pudding, where the texture matters less. Otherwise, start over.
Why Microwave Rice Works
Microwaves heat food by exciting water molecules. Since rice cooking is all about water absorption, the microwave is a natural fit.
The heat distributes evenly from all sides, unlike a stovetop where the bottom gets the most heat. This prevents scorching and ensures every grain cooks at the same rate.
There’s no stirring required. No watching the pot. No adjusting the flame. You set the timer and walk away.
Cleanup is minimal. One bowl, one lid. Both go in the dishwasher. Compare that to a rice cooker with its gasket rings, inner pots, and condensation collectors.
The taste and texture are identical to stovetop rice or rice cooker rice. Side by side, you couldn’t tell the difference. The microwave’s reputation as a shortcut doesn’t apply here. It’s simply another way to apply heat to water.
The Timing is Simple
Set the timer, walk away, come back to fluffy rice. Twenty-five minutes from raw to ready, two power levels, zero babysitting. Once you’ve done it once, the method becomes automatic. The microwave does the work while you cook everything else.