3 minutes high pressure for white rice, then 10 minutes natural release. Total time is around 25 minutes when you count pressurizing, but it’s entirely hands-off. The ratio is 1:1, the method is foolproof, and you’ll never burn rice on the stovetop again.
The Quick Answer: Timing and Settings
White jasmine or basmati rice cooks for 3 minutes on high pressure, followed by 10 minutes of natural release. The Instant Pot takes about 10-12 minutes to pressurize before cooking even begins. From the moment you close the lid to the moment you fluff the rice with a fork, expect 25 minutes. But here’s the beauty: you don’t touch it, you don’t watch it, you don’t stir it.
| Rice Type | Pressure Time | Release Method | Water Ratio |
|---|---|---|---|
| White (jasmine/basmati) | 3 minutes | 10 min NR + QR | 1:1 |
| Brown rice | 15 minutes | 10 min NR + QR | 1:1.25 |
| Wild rice | 20 minutes | Full NR | 1:1.5 |
The numbers are simple. The execution is even simpler.
The Complete Method Step by Step
Before You Start: Rinse the Rice
Place your rice in a fine-mesh strainer over a bowl. Run cold water through it, gently moving the grains with your fingers. The water will look cloudy at first, milky with surface starch. Keep rinsing until the water runs mostly clear. This takes 1-2 minutes and removes the excess starch that makes rice clump into gummy blocks instead of separating into fluffy grains.
Exception: if you’re using enriched American white rice (check the package), skip the rinse. That cloudy coating is actually added vitamins, not starch. For jasmine, basmati, or any Asian rice variety, always rinse.
Drain well. Really well. Excess water clinging to the grains will throw off your ratio.
The Perfect Water Ratio
For white rice in the Instant Pot, use a 1:1 ratio. One cup rice, one cup water. Two cups rice, two cups water.
This is different from stovetop cooking where you’d use more water. Why? Because the Instant Pot is a sealed environment. Nothing evaporates. Every drop of water you add stays in the pot and gets absorbed by the rice. On the stove, water escapes as steam, so you compensate with extra liquid. Not here.
Some people prefer a 1:1.25 ratio (1 cup rice to 1¼ cups water) for a slightly softer, stickier texture. If you’re making fried rice or pilaf, stick to 1:1 for separated, chewy grains. If you want rice for stuffing or rice balls, try 1:1.25.
Cooking Process
- Add rinsed rice and water to the Instant Pot inner pot.
- Close the lid. Turn the steam release valve to Sealing position.
- Press Pressure Cook (or Manual). Set to High Pressure. Set timer to 3 minutes.
- The pot will take 10-12 minutes to come to pressure. You’ll see “On” on the display, then the countdown starts.
- When the timer beeps, leave it alone. Let the pressure release naturally for 10 minutes. You’ll see the float valve still up.
- After 10 minutes, turn the valve to Venting to release any remaining pressure. The float valve will drop.
- Open the lid. Immediately fluff the rice with a fork, scraping up from the bottom. Serve.
Don’t skip the fluffing step. Rice at the bottom can compact if you let it sit. A quick toss with a fork separates the grains and releases steam.
Why 10 Minutes Natural Release Matters
This isn’t idle waiting time. The rice is still cooking. The residual pressure and heat finish the job without making the grains mushy.
If you quick-release immediately after the timer beeps, two things happen: the sudden pressure drop can make the rice blow out and turn gummy, and the grains won’t have time to fully absorb the water. You’ll end up with sticky, wet, undercooked rice with a weird texture.
Ten minutes is the sweet spot. Not five, not fifteen. Ten.
Different Rice Types, Different Times
White Rice (Jasmine, Basmati, Long Grain)
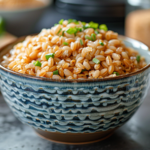
The standard 3-minute method works for all white rice varieties: jasmine, basmati, long-grain supermarket rice. The texture comes out light, fluffy, and separated. Each grain distinct, with a slight chew. Perfect for serving alongside curries, stir-fries, grilled proteins, or building grain bowls.
For stickier rice (think sushi-adjacent, though not quite sushi-grade), bump the timer to 4 minutes. This works if you’re making rice for recipes where you need the grains to hold together.
Brown Rice
Brown rice keeps its bran layer intact, which means it needs more time and slightly more water to soften. Cook for 15 minutes on high pressure with a 1:1.25 water ratio. Follow the same 10-minute natural release.
It’s still faster than the stovetop (which takes 45-50 minutes) and more reliable. No burned bottom, no crunchy bits, no guessing.
Other Varieties
Short-grain Japanese rice (the kind used for sushi and rice bowls): 2 minutes high pressure, but only after soaking the rinsed rice in the cooking water for 20-30 minutes first. This pre-soak is essential for short-grain rice. Use a 1:1 ratio.
Wild rice: 20 minutes high pressure, 1:1.5 ratio, full natural release. Wild rice isn’t actually rice (it’s a grass seed), so it behaves differently.
Forbidden black rice: I’m still testing the ideal Instant Pot method for this one. The texture can go from chewy to mushy without much middle ground. Stick to stovetop for now if you want consistent results.
Common Problems and How to Fix Them
Rice Came Out Mushy
You added too much water, or you cooked it too long. The Instant Pot is precise, so even an extra ¼ cup of water can turn fluffy rice into porridge.
Solution: Next time, measure carefully. Use the same cup for rice and water. Stick to the 3-minute timer, not 4 or 5. Make sure you’re doing 10 minutes natural release, not full natural release (which can add another 10-15 minutes of cooking).
Rice Is Hard or Undercooked
This usually happens if you quick-released the pressure too soon, or if you live at high elevation.
Solution: Always wait the full 10 minutes before venting. If you’re above 3,000 feet elevation, add 1-2 extra minutes to the cooking time. Thinner air means water boils at a lower temperature, so food takes longer to cook.
Another possibility: your rice is old. Rice that’s been sitting in the pantry for over a year can dry out and need more water or time.
Rice Sticking to Bottom
If you’re making a small batch (1 cup or less) in a large 6-quart Instant Pot, the rice can scorch on the bottom before the pot comes to pressure.
Solution: Make at least 1.5-2 cups of rice in a 6-quart pot. Or use a 3-quart Instant Pot for smaller portions. Also, make sure you rinsed the rice well. Surface starch makes sticking worse.
If you’re using the pot-in-pot method (rice in a separate bowl inside the Instant Pot), make sure the bowl sits on a trivet with water underneath. Don’t put the rice bowl directly on the bottom of the inner pot.
Instant Pot Won’t Come to Pressure
Check three things: Is the steam release valve in the Sealing position? Is the silicone sealing ring properly seated in the lid? Is there enough liquid in the pot?
If you’re making less than 1 cup of rice, you might not have enough liquid for the pot to pressurize. Add a bit more water (and adjust your expectations for texture accordingly).
Practical Tips from Real Kitchen Experience
Scale to your pot size. In a 3-quart Instant Pot, you can make as little as 1 cup of rice. In a 6-quart, stick to 1.5 cups minimum, 4 cups maximum. The pot needs enough volume to come to pressure properly.
Add flavor while you cook. Toss in a pinch of salt, a drizzle of olive oil, or a knob of butter before closing the lid. You can also replace half the water with chicken or vegetable broth for a richer taste. A bay leaf or a few cardamom pods add a subtle aromatic note.
Make big batches for meal prep. Cooked rice keeps in the fridge for 3-4 days in an airtight container. It freezes beautifully for up to 3 months. Spread it on a baking sheet to cool quickly, then portion into freezer bags. Reheat in the microwave with a splash of water.
Time it with your main dish. If you’re cooking chicken, vegetables, or a stew on the stove, start the rice first. By the time you’ve finished prepping and cooking everything else, the rice is done and waiting. Or use the pot-in-pot method to cook rice and a protein simultaneously in the Instant Pot.
Use leftover rice wisely. Day-old rice is perfect for fried rice because the grains have dried out slightly and won’t turn mushy when you stir-fry them. Fresh rice is too moist and clumps.
High elevation adjustment. If you live above 3,000 feet, add 1 minute to the cooking time. Above 5,000 feet, add 2 minutes. The lower atmospheric pressure means water boils at a lower temperature, so food takes longer to cook through.
Why Cook Rice in the Instant Pot
No watching. No stirring. No lifting the lid to check. No burned crusty layer stuck to the bottom of the pot that takes 20 minutes to scrub off.
You get consistent results every single time. The Instant Pot doesn’t care if you’re distracted, if the phone rings, if the baby cries. It does its job and turns itself off. The rice waits for you, staying warm until you’re ready to serve.
It’s faster than a rice cooker by about 30 minutes, and faster than the stovetop if you count the time spent watching and adjusting heat. It frees up a burner for other dishes. And if you’re already using your Instant Pot for the main course, you can cook rice in a separate small pot using the pot-in-pot method.
The Instant Pot turns rice from a task that requires attention into a task that requires three minutes of setup. That’s it. The rest happens without you.